When you’re sure that the physical connection between
your computers is set up correctly, you’re ready to configure Windows
7. With today’s Plug and Play network cards and with all the needed
software built in to Windows, this configuration is a snap.
1. Configuring the TCP/IP Protocol
After
your network adapters are all installed—and, if you’re using a wired
network, cabled together—you need to ensure that each computer is
assigned an IP address. This is a
number that uniquely identifies each computer on the network. These
numbers are assigned in one of the following ways:
If the network has a computer that uses
Windows Internet Connection Sharing to share an Internet connection, if
you have a hardware Internet sharing router, or if you are on a
corporate LAN running Windows Server, each computer will be assigned an
IP address automatically—they’re doled out by the Dynamic Host
Configuration Protocol (DHCP) service that runs on the sharing computer
or in the router. This is why I recommend using a router even if you
aren’t setting up a shared Internet connection.
By
default, Windows sets up new network adapters to receive an address
this way. If your network fits into this category, you don’t have to
change any settings, and you can just skip ahead to the section “If You Have a Shared Internet Connection.”
Each computer can be given an address manually, which is called a static address
as opposed to a dynamic (automatic) one. If you are not going to use a
router or a shared Internet connection, you should set up static
addressing. I tell you how shortly.
If no
static settings are made but no DHCP server exists on the network,
Windows automatically assigns IP addresses anyway. Although the network
will work, this is not an ideal situation and can slow Windows down. The
setup steps I show in the following two sections will let you avoid
having IP addresses be assigned this way.
If you’re setting up a new computer on an
existing network, use whatever scheme the existing computers use; check
their settings and follow suit with your new one. Otherwise, use either
of the schemes described in the following two sections.
If You Have No Shared Internet Connection
If you’re setting up a new network from
scratch, and you do not have a connection sharing computer, router, or
wireless access point, you should use static addressing. If your
computer will be part of an existing network with predetermined IP
addresses, your network manager will provide you with the setup
information.
Otherwise, for most home and small office networks, the following static address scheme should work fine:
| IP Address | 192.168.1.1 for your first computer, |
| | 192.168.1.2 for your second computer, |
| | 192.168.1.3 for your third, and so on. |
| | I strongly suggest that you keep a list of your computers and the addresses that you assign to each of them. |
| Subnet Mask | 255.255.255.0 |
| Default Gateway, | (Leave blank) |
| Preferred DNS Server | (Leave blank) |
| Alternate DNS Server | (Leave blank) |
Follow these steps on each computer to ensure that the network is set up correctly:
1. | Log
on using a Computer Administrator account. Click Start, Control Panel,
View Network Status and Tasks (under Network and Internet), Change
Adapter Settings. Right-click the Local Area Connection or Wireless
Connection icon that corresponds to your LAN connection and select
Properties.
Tip If your computer will
move back and forth between a network that uses automatic configuration
and a network that uses static settings—say, between work and
home—select Obtain An IP Address Automatically. A tab named Alternate
Configuration will appear. Select the Alternate Configuration tab and
configure the static settings. Windows will use these static settings
only when a DHCP server is not present. |
|
2. | Highlight Internet Protocol Version 4 (TCP/IPv4) and click Properties.
|
3. | Change the settings in the Properties dialog box. Figure 1 shows an example, but you must use the address values appropriate for your computer and your network.
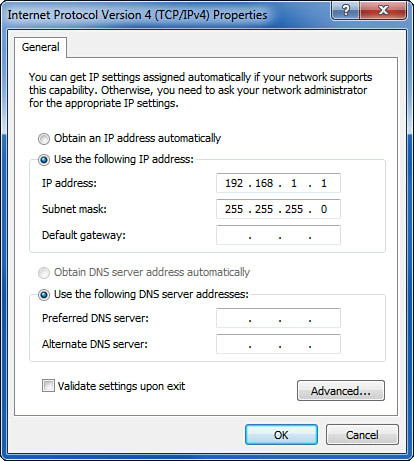
|
If You Have a Shared Internet Connection
As I mentioned previously, if you plan to share an Internet connection with all the computers on your network. Keep the following tips in mind:
If you will use Windows Internet
Connection Sharing, first set up the one computer that will be sharing
its connection, then set up networking in your other computers.
Note
If you add a shared
Internet connection later, go to every one of your computers, bring up
the TCP/IP Properties dialog box shown in Figure 17.12
again, and select Obtain an IP Address Automatically and Obtain DNS
Server Address Automatically. Otherwise, the shared connection will not
work. |
All
the computers, including the one sharing its Internet connection,
should have their Local Area Network connection set up to Obtain an IP
Address Automatically and Obtain DNS Server Address Automatically (see Figure 17.12).
If
you will use a hardware router, configure the router first, following
the manufacturer’s instructions. Enable its DHCP feature. If you can,
set the starting DHCP IP address to 100 so that numbers from 2 to 99 can
be used for computers with static settings. Also, if your ISP has
provided you with static IP address settings, be sure to enter your
ISP’s DNS server addresses in the router’s setup screens so it can pass
them to the computers that rely on the router for their IP setup.
Now that your new network connection is set up,
be sure to assign it the correct network location, as described in the
next section. This is a critical part of Windows networking security.